Lorem ipsum dolor sit amet, consectetur adipiscing elit. Test link

Switching Manjaro Kernels via CLI

Manjaro kernel version addition, update, downgrade, and removal can happen via two ways, i.e., Pacman and Manjaro hardware detection tool (mhwd). This section discusses how to switch kernels using Manjaro package manager Pacman and its unique feature mhwd-kernel, side by side.

Pacman: uses the official manjaro repository to upgrade the package database and all system packages.

mhwd-kernel: manjaro hardware detection command unique feature that provides easy installation and management of system kernels.

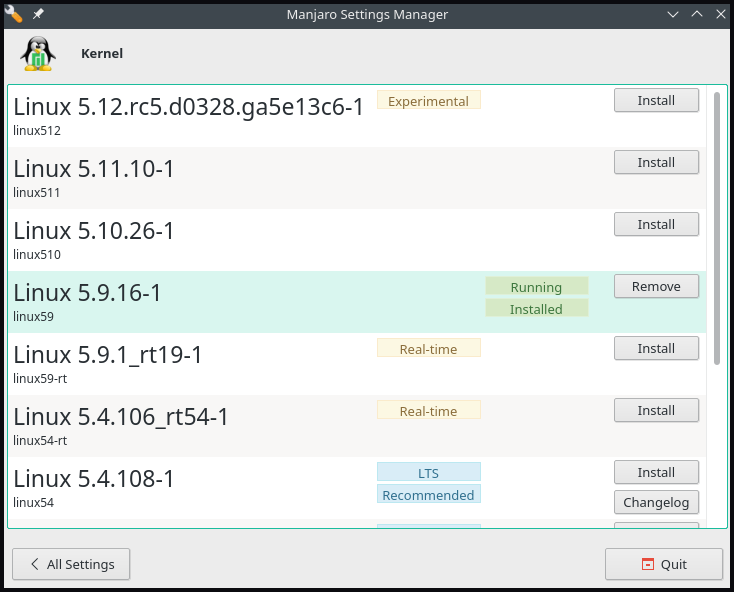
Identify In-Use Kernel

Before beginning the process of kernel version upgrade/downgrade, identify current version details via the mhwd-kernel command:

 manjaro@manjaro:~$ mhwd-kernel -li

Currently running: 5.9.16-1-MANJARO (linux59)

The following kernels are installed in your system:

* linux59

The above command outputs the system kernel version, 5.9.16-1-MANJARO, along with the list of installed kernels.

Upgrade Kernel

One of the other distinguishing features of Manjaro is the use and installation of multiple Kernel versions, as well as the user’s access to bleeding-edge kernels.

Use the pacman command to list all the kernel version packages with 5.x and below:

[ manjaro @ manjaro ~ ] $ pacman -Ss linux5* | grep "kernel and modules" 

The Linux414 kernel and modules
The Linux419 kernel and modules
The Linux44 kernel and modules
The Linux49 kernel and modules
The Linux510 kernel and modules
The Linux511 kernel and modules
The Linux512 kernel and modules
The Linux54 kernel and modules
The Linux59 kernel and modules
The Linux-rt-lts-manjaro kernel and modules
The Linux-rt-manjaro kernel and modules
The Linux54-rt kernel and modules
The Linux59-rt kernel and modules

The above 

command outputs all kernel versions, whereas kernels with the “rt” represent unstable or real-time kernel release.

Use either of the following commands to add the new kernel to the installed list:

[manjaro@manjaro ~]$ sudo mhwd-kernel -i linux510
  Or
[ manjaro@manjaro ~]$ sudo pacman -S linux510
 

As shown above, it is not necessary to add the full kernel version number. Similarly, it’s important to note that Manjaro automatically updates all modules of the newly installed version from an old one. For instance, to update from 59 to 5.10, manjaro automatically updates modules in 5.19 with all modules in 5.14.

The above command keeps the old kernel such that the system allows users to choose the kernel preference at the boot screen.

rmc Option

The mhwd-kernel command’s rmc option plays a critical role, as it deletes the existing kernel at the installation of the new kernel. In contrast, the Manjaro official website recommends keeping the old one for a short interval when the system is updating the bleeding-edge kernel.


[ manjaro@manjaro ~ ]$ sudo mhwd-kernel -i linux510 rmc

In any case, Manjaro automatically configures the new kernel; once done, reboot to make changes effective.

Uninstall Kernels

Before attempting to delete any kernel, make sure it’s not currently in use by Manjaro. It’s necessary to delete a total of three main elements, the kernel, its header, and its extra modules, to remove/uninstall from the system.

Use the mhwd-kernel command to remove kernel headers:

[ manjaro@manjaro ~]$ sudo mhwd-kernel -r linux510 

Use the following pacman command to remove all kernel elements in a single go:

[manjaro@manjaro ~]$ sudo pacman -R linux50 linux50-headers linux50-extramodules

Note: The above command may generate an error if any of the three-element is not present on the system. Similarly, if Manjaro is a virtual machine, this command won’t delete some kernels that contain necessary elements for the virtualization process.

Switching Kernel via GUI

Manjaro Setting Manager offers a series of settings unique to its distribution for hardware configuration and kernel installation. Press the ‘Windows’ key and type ‘Manjaro Setting Manager’ to view the GUI.


تعليقان (2)

  1. pacman -Ss linux5
    NOT pacman -Ss linux5*
  2. And terima kasih for this tutorial !